
Cheap Post-Processing
I guess that, say, Photoshop would be more than adequate for all of your post-processing needs, but that would entail spending money. Instead, I use ImageJ, a sofware package that was developed by the National Institutes of Health specifically for the purpose of manipulating and analyzing microscopic images. It is a free, open-source package, it works pretty well, and since it is a Java program you can run it on any machine that has a Java interpreter (which is pretty much all of them).
Something that I have just gotten to work is a processing technique called “Extended Depth of Field”. The idea is that you take a series of pictures focusing on different levels of your specimen, and then use “wavelet processing” to sort out the bits of each picture that are in focus and use them to assemble a finished picture where everything is in focus simultaneously.
So, I started with a picture focused on the surface the subject was lying on (an Ichneumon wasp, in this case):
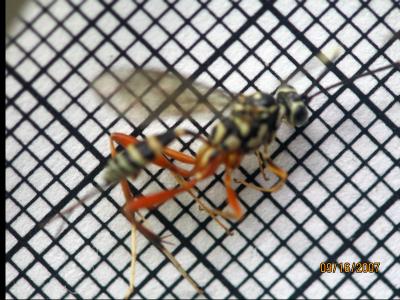
then pictures focused on progressively higher levels:

finishing with a picture of the highest parts (the wing and one antenna):

I then used the ImageJ software to assemble these pictures into a “stack”, so they could be handled as a unit.
In order to go further, I needed three plugins for ImageJ: the stackreg and turboreg plugins to “register” the individual pictures in the stack to make sure they were all lined up properly, and the extended depth of field plugin to do the actual generation of the new image.
The stack registration plugins were the things that I needed to have in order to get this to work with my equipment: when I first tried this some months ago with just the Extended Depth of Field plugin, I got crummy results because there are tiny shifts in position between pictures,and I basically ended up with what I can best describe as a “sharply-focused blur”:

Using the stack-registering plugins was pretty simple [2]- I just ran “stackreg”, which went through the whole stack comparing pairs of images with “turboreg” and shifting them back and forth/up and down until everything lined up. Once the stack was registered, it was just a case of starting up the extended depth of field plugin again and letting it run. One point to keep in mind is that, the bigger the images are, the longer it takes and the more memory it sucks down. When I tried it on full-resolution pictures, it never actually finished in periods of up to an hour. So to keep the times reasonable I ended up doing this on images that were 800×600 pixels, which meant that it finished in about a minute.
And here is the result: it isn’t perfect, the upper edge of the wing is a little bit peculiar, and one antenna turned into a blur. The wing problem was probably a case of the sofware selecting the image where the background grid was in focus, and not where the transparent wing was in focus. The antenna issue might have been due to motion between pictures. It obviously could be a better picture, and I need more practice, but it does bring most of the wasp into sharp focus all at once, something that I wasn’t able to do with the original photographs.
